In this tutorial, we are going on how to create rest API using passport authentication in laravel 7(Laravel 7 REST API With Passport Authentication Tutorial). so here we are using the laravel/passport package for rest API.
The Laravel Passport package is provided by laravel framework. so we can easily create and manage the API in laravel. let’s follow the below steps to how to create rest API with authentication in laravel.
Overview
Step 1: Install Laravel
Step 2: Install Package
Step 3: Add Service Provider
Step 4: Setting Database Configuration
Step 5: Run Migration Command and Passport Install
Step 6: Passport Configuration
Step 7: Create Route
Step 8: Create a Controller
Step 9: Run The Application
Step 1: Install Laravel
We are going to install laravel 6, so first open the command prompt or terminal and go to go to xampp htdocs folder directory using the command prompt. after then run the below command.
1 | composer create-project --prefer-dist laravel/laravel larave7_passport_api |
Step 2: Install Package
Now, we are going to install the “laravel/passport” package using the below command.
1 | composer require laravel/passport |
Step 3: Add Service Provider
We will add below providers and aliases in the “config/app.php” file.
1 2 3 4 5 6 7 | 'providers' => [ .... Laravel\Passport\PassportServiceProvider::class, ], |
Step 4: Setting Database Configuration
After complete installation of laravel. we have to database configuration. now we will open the .env file and change the database name, username, password in the .env file. See below changes in a .env file.
1 2 3 4 5 6 | DB_CONNECTION=mysql DB_HOST=127.0.0.1 DB_PORT=3306 DB_DATABASE=Enter_Your_Database_Name(laravel7_passport_api) DB_USERNAME=Enter_Your_Database_Username(root) DB_PASSWORD=Enter_Your_Database_Password(root) |
Step 5: Run Migration Command and Passport Install
Now, create the migrate table using the below command and we will create a token key for security using the passport install command.
1 | php artisan migrate |
1 | php artisan passport:install |
Step 6: Passport Configuration
here, in this step, we have to the configuration in User.php, AuthServiceProvider.php and auth.php. so you can follow the below code.
app/User.php
1 2 3 4 5 6 7 8 9 10 11 12 13 14 15 16 17 18 19 20 21 22 23 24 25 26 27 28 29 30 31 32 33 34 35 36 37 38 39 40 41 | <?php namespace App; use Illuminate\Contracts\Auth\MustVerifyEmail; use Illuminate\Foundation\Auth\User as Authenticatable; use Illuminate\Notifications\Notifiable; use Laravel\Passport\HasApiTokens; class User extends Authenticatable { use Notifiable,HasApiTokens; /** * The attributes that are mass assignable. * * @var array */ protected $fillable = [ 'name', 'email', 'password', ]; /** * The attributes that should be hidden for arrays. * * @var array */ protected $hidden = [ 'password', 'remember_token', ]; /** * The attributes that should be cast to native types. * * @var array */ protected $casts = [ 'email_verified_at' => 'datetime', ]; } ?> |
app/Providers/AuthServiceProvider.php
1 2 3 4 5 6 7 8 9 10 11 12 13 14 15 16 17 18 19 20 21 22 23 24 25 26 27 28 29 30 31 32 | <?php namespace App\Providers; use Illuminate\Foundation\Support\Providers\AuthServiceProvider as ServiceProvider; use Illuminate\Support\Facades\Gate; use Laravel\Passport\Passport; class AuthServiceProvider extends ServiceProvider { /** * The policy mappings for the application. * * @var array */ protected $policies = [ // 'App\Model' => 'App\Policies\ModelPolicy', ]; /** * Register any authentication / authorization services. * * @return void */ public function boot() { $this->registerPolicies(); Passport::routes(); Passport::tokensExpireIn(now()->addDays(15)); Passport::refreshTokensExpireIn(now()->addDays(30)); } } ?> |
config/auth.php
1 2 3 4 5 6 7 8 9 10 11 | 'guards' => [ 'web' => [ 'driver' => 'session', 'provider' => 'users', ], 'api' => [ 'driver' => 'passport', 'provider' => 'users', ], ], |
Step 7: Create Route
Add the following route code in the “routes/api.php” file.
1 2 3 4 5 6 7 8 9 10 11 12 13 14 15 16 17 18 19 20 21 22 23 24 25 | <?php use Illuminate\Http\Request; use Illuminate\Support\Facades\Route; /* |-------------------------------------------------------------------------- | API Routes |-------------------------------------------------------------------------- | | Here is where you can register API routes for your application. These | routes are loaded by the RouteServiceProvider within a group which | is assigned the "api" middleware group. Enjoy building your API! | */ Route::post('login', 'API\AuthController@login'); Route::post('register', 'API\AuthController@register'); Route::middleware('auth:api')->group(function(){ Route::post('user_detail', 'API\AuthController@user_detail'); }); ?> |
Step 8: Create a Controller
Now, we need to create an API directory and controller file, so first we will create an API directory and AuthController.php file. after then created a file then we will create the rest API method. so you can follow the below code.
app/Http/Controllers/API/AuthController.php
1 2 3 4 5 6 7 8 9 10 11 12 13 14 15 16 17 18 19 20 21 22 23 24 25 26 27 28 29 30 31 32 33 34 35 36 37 38 39 40 41 42 43 44 45 46 47 48 49 50 51 52 53 54 55 56 57 58 59 60 61 62 63 | <?php namespace App\Http\Controllers\API; use App\User; use Validator; use Illuminate\Http\Request; use App\Http\Controllers\Controller; use Illuminate\Support\Facades\Hash; use Illuminate\Support\Facades\Auth; use Symfony\Component\HttpFoundation\Response; class AuthController extends Controller { public function login(Request $request){ $credentials = [ 'email' => $request->email, 'password' => $request->password ]; if( auth()->attempt($credentials) ){ $user = Auth::user(); $success['token'] = $user->createToken('AppName')->accessToken; return response()->json(['success' => $success], 200); } else { return response()->json(['error'=>'Unauthorised'], 401); } } public function register(Request $request) { $validator = Validator::make($request->all(), [ 'name' => 'required', 'email' => 'required|email', 'password' => 'required', 'password_confirmation' => 'required|same:password', ]); if ($validator->fails()) { return response()->json([ 'error'=> $validator->errors() ]); } $data = $request->all(); $data['password'] = Hash::make($data['password']); $user = User::create($data); $success['token'] = $user->createToken('AppName')->accessToken; return response()->json(['success'=>$success], 200); } public function user_detail() { $user = Auth::user(); return response()->json(['success' => $user], 200); } } ?> |
Step 9: Run The Application
We can start the server and run this application using the below command.
1 | php artisan serve |
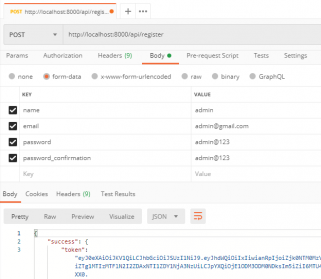
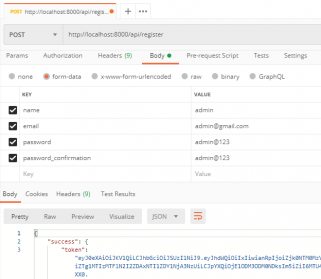
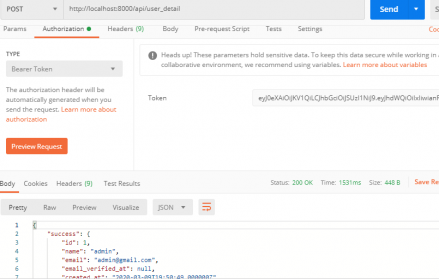
Now, you can call the rest API using postman. so we shared some screenshot.
Register Api
Login Api
User Get Api


